
Imagine waking up in your cozy log cabin, completely shielded from the elements, safe from moisture, rot, and extreme weather conditions.
However, without proper weatherproofing log cabin, these homes are highly susceptible to damage, leading to costly repairs and decreased longevity.
In this Article, we will explore the essential steps for log cabin weatherproofing, including log cabin sealing, log cabin staining, log cabin chinking, techniques to ensure your cabin remains in top condition for decades.
Whether you’re building a new cabin or maintaining an existing one, this guide will provide expert insights to enhance log cabin protection and durability.
Table of Contents
- Why Weatherproofing Your Log Cabin is Essential
- Inspecting Your Log Cabin for Weather Damage
- Sealing & Staining
- Chinking and Caulking
- Conclusion
Why Weatherproofing Your Log Cabin is Essential
Log cabins are exposed to a range of environmental factors that can cause deterioration. Understanding why log cabin preservation is necessary will help homeowners take proactive steps.
The Impact of Weather on Log Cabins
- Moisture and Rot: Excess moisture can cause wood to swell, leading to decay and structural instability.
- UV Damage: Prolonged sun exposure can weaken wood fibers, causing cracks and fading.
- Pests: Insects such as termites and carpenter ants thrive in untreated log cabins.
- Temperature Fluctuations: Unsealed gaps allow cold air in during winter and heat loss, reducing energy efficiency.
The Cost of Neglecting Weatherproofing
- Expensive log replacements due to rotting wood.
- Increased energy costs due to poor log cabin insulation.
- Mold and mildew growth, which can affect indoor air quality.
By implementing the right log cabin exterior treatment techniques, you can extend the lifespan of your cabin and maintain its rustic charm.
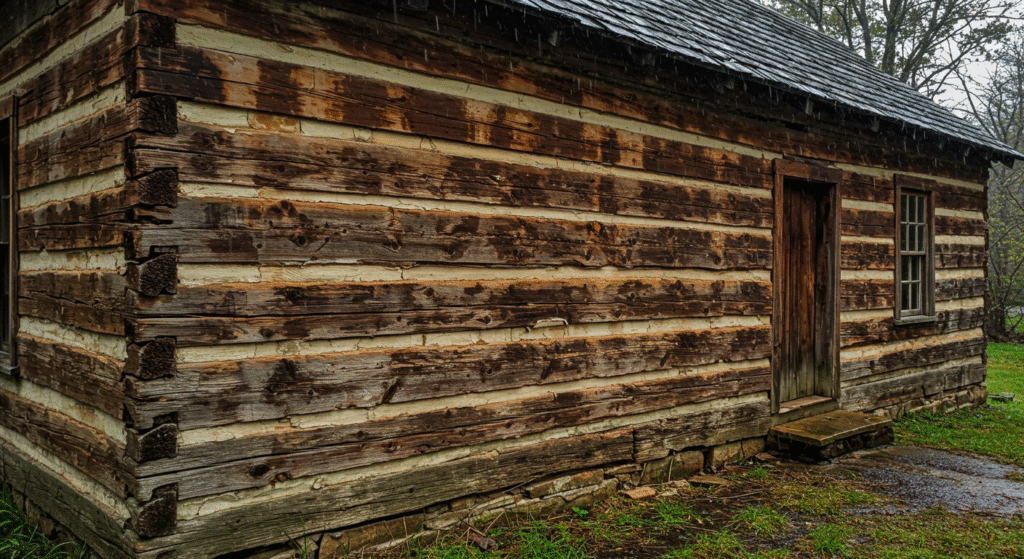
Inspecting Your Log Cabin for Weather Damage
Regular log cabin maintenance is essential to detect weather-related damage early and prevent costly repairs. By conducting thorough inspections, you can identify vulnerabilities and take proactive steps to maintain your cabin’s structural integrity.
Key Areas to Inspect for Weather Damage
Exterior Logs
- Check for log cabin rot prevention by inspecting logs for cracks, soft spots, and discoloration.
- Look for signs of log cabin moisture control issues, such as mold, mildew, or water stains.
- Examine joints and seams for gaps where water or pests can enter.
Chinking & Caulking
- Inspect log cabin chinking for cracks, shrinkage, or separation between logs.
- Check caulking around doors and windows for wear and tear that could cause air leaks.
Roof & Gutters
- Examine the roof for missing or damaged shingles that could lead to leaks.
- Clean gutters and downspouts regularly to ensure proper drainage and prevent water damage.
- Ensure flashing around the chimney and vents is intact to prevent leaks.
Doors & Windows
- Test seals around doors and windows to prevent drafts and improve log cabin insulation.
- Look for condensation between window panes, which may indicate seal failure.
Foundation & Drainage
- Check for cracks or shifting in the foundation, which could be caused by water damage.
- Ensure that the ground slopes away from the cabin to prevent water from pooling around the foundation.
When to Inspect Your Log Cabin
- Spring: After winter, check for damage caused by snow, ice, and freezing temperatures.
- Fall: Before winter, ensure all weatherproofing measures are in place.
- After Storms: Assess any damage from heavy rain, snow, or wind.
Tools for a Thorough Inspection
- Moisture meter to detect hidden dampness inside logs.
- Flashlight for inspecting dark or hard-to-reach areas.
- Binoculars to check the roof from a distance.
- Ladder for close-up inspections of the roof and gutters.
By following these log cabin maintenance tips, you can keep your home in peak condition, ensuring longevity and enhanced log cabin protection from the elements.
Sealing & Staining of log cabin
Proper log cabin sealing and log cabin staining are the most effective ways to protect your cabin from harsh weather conditions. These treatments prevent water infiltration, UV damage, and insect infestations, ensuring the longevity of your cabin’s wooden structure.
Why Sealing and Staining Are Essential
- Prevents Water Damage: A well-sealed cabin repels rain, snow, and excess moisture, reducing the risk of log cabin rot prevention.
- UV Protection: Log cabin staining shields wood from harmful UV rays, preventing fading and cracking.
- Enhances Aesthetic Appeal: High-quality log cabin exterior treatment enhances the natural beauty of wood while offering protection.
- Pest Prevention: Proper log cabin sealing blocks wood-boring insects and pests from entering cracks and crevices.
Best Sealants for Log Cabins
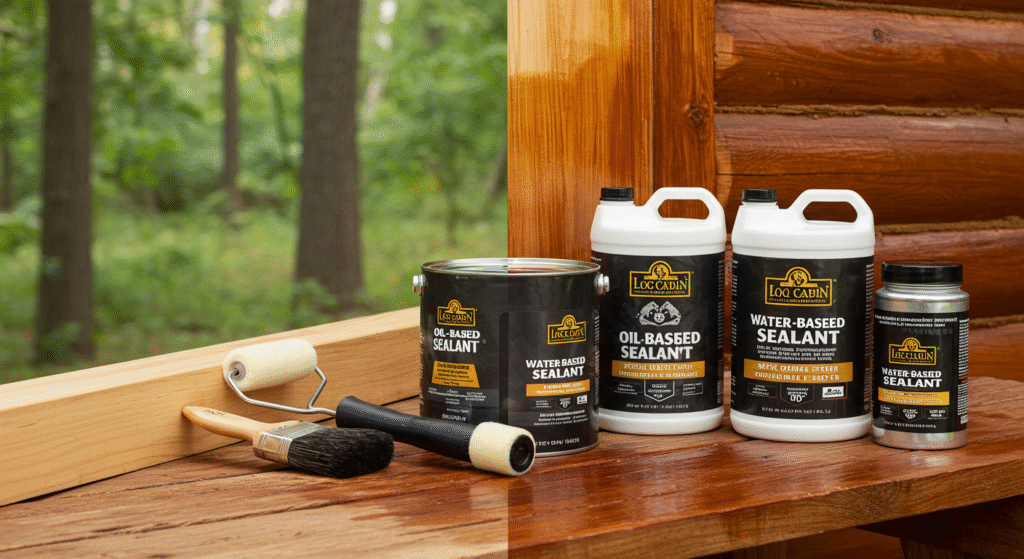
Choosing the right sealant is crucial for effective log cabin weatherproofing. Here are the most effective types:
- Oil-Based Sealants:
- Penetrate deep into the wood for long-lasting protection.
- Ideal for high-moisture areas where extended durability is needed.
- Water-Based Sealants:
- More environmentally friendly and easy to apply.
- Provide excellent protection with a quicker drying time.
Top Recommended Products:
- Permachink Lifeline Ultra-2 (Superior durability and UV resistance)
- Sashco Capture Log Stain (Deep penetration with flexible protection)
How to Properly Stain and Seal a Log Cabin
Follow these steps to ensure optimal log cabin waterproofing:
- Clean the Logs Thoroughly
- Remove dirt, mildew, and any old finish using a wood cleaner.
- Let the logs dry completely before proceeding.
- Apply the Stain Evenly
- Use a brush, roller, or sprayer to apply log cabin staining in smooth, even coats.
- Work in sections to prevent overlap marks.
- Seal the Surface
- Once the stain has dried, apply a high-quality log cabin sealing product.
- Ensure even coverage, paying attention to cracks and exposed areas.
- Allow Proper Drying Time
- Drying times vary based on humidity and temperature; check manufacturer instructions.
- Avoid exposing freshly treated logs to rain within the first 24-48 hours.
When to Reseal Your Log Cabin
- Every 3 to 5 years, depending on environmental exposure and climate conditions.
- If logs start to absorb water instead of repelling it, it’s time to reseal.
- Check for signs of fading, peeling, or water stains as indicators for reapplication.
By following these log cabin maintenance tips, you can ensure superior log cabin protection while keeping your home looking beautiful and well-maintained.
Chinking and Caulking of log cabin
Why Chinking and Caulking Are Essential for Log Cabins
Proper log cabin maintenance is crucial for longevity and structural integrity. Chinking and caulking are vital processes that seal gaps between logs, ensuring a weatherproof log cabin. Here’s why these steps are necessary:
Prevents Air Leaks
Gaps between logs can cause drafts and reduce energy efficiency. Proper log home insulation using chinking ensures that heat stays inside during winter and outside during summer, reducing energy costs.
Waterproofing Protection
Unsealed cracks allow water infiltration, leading to wood rot, mold growth, and log deterioration. Chinking and caulking create a moisture-resistant barrier, safeguarding the logs from prolonged exposure to rain and humidity.
Pest Prevention
A poorly sealed log home is an open invitation for termites, carpenter ants, and rodents. Filling gaps with the right log home sealant prevents pest infestations and protects the integrity of the wood.
Enhances Structural Integrity
Over time, logs shrink and settle, causing gaps and separations. Regular chinking and caulking help maintain the structural stability of your log home, preventing excessive movement and log shifting.
Best Chinking and Caulking Products for Log Cabins
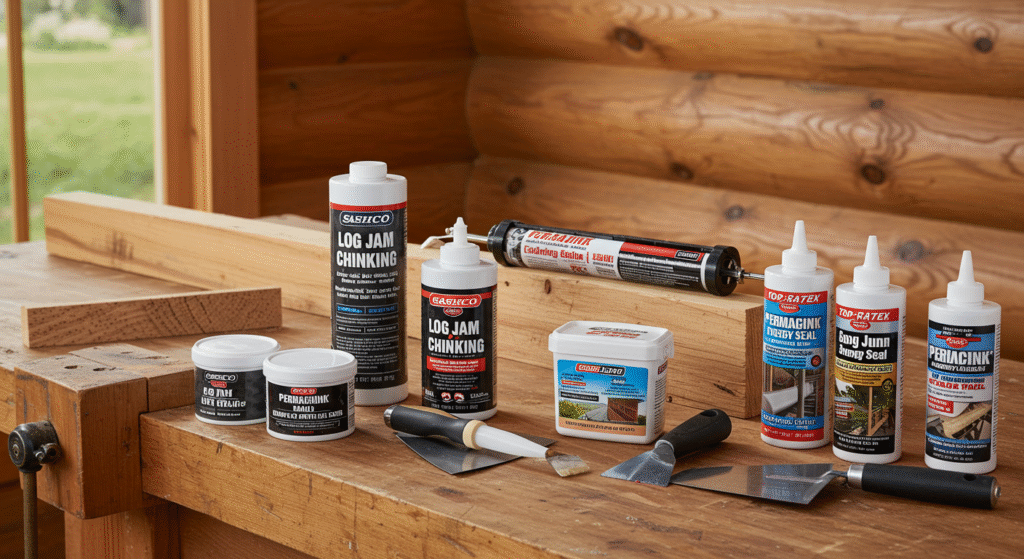
Choosing the right log home chinking or caulking compound is crucial for long-lasting results. Here are some top-rated products:
Sashco Log Jam Chinking
- Offers flexibility and superior adhesion
- Designed for expanding and contracting logs
- Provides a realistic mortar-like finish
Perma-Chink Energy Seal
- Long-lasting log cabin preservation solution
- Forms a weatherproof and airtight barrier
- Available in multiple wood-tone colors
Weatherall Triple Stretch Caulk
- Excellent for small cracks and gaps
- Highly elastic and durable
- Matches well with log stain finishes
How to Apply Chinking and Caulking to a Log Cabin
Step 1: Clean the Gaps
- Remove dirt, dust, and old chinking debris
- Use a wire brush or compressed air for deep cracks
- Ensure logs are completely dry before application
Step 2: Apply the Chinking or Caulking
- Load the chosen log cabin sealant into a caulking gun
- Apply an even bead along the gaps
- For larger gaps, use a backer rod before applying chinking
Step 3: Smooth the Surface
- Use a trowel, foam brush, or wet finger to smooth the material
- Ensure an even and consistent finish
- Avoid over-applying to prevent cracking or peeling
Step 4: Allow Proper Drying Time
Check for shrinkage or gaps after curing and apply touch-ups if needed
Most chinking takes 24-48 hours to cure fully
Avoid exposure to heavy rain during the drying process
Conclusion
Log cabin weatherproofing is an investment in log cabin protection, longevity, and comfort. By implementing these techniques, you can safeguard your home against harsh weather and costly damage.
Don’t wait until problems arise—take action today! Prioritize log cabin weatherproofing and enjoy a secure, well-maintained, and long-lasting log cabin retreat for generations to come. Whether you choose to tackle the tasks yourself or hire professionals, the key is to remain diligent in protecting your investment.
Your dream log cabin deserves the best protection!